My existing fridge and freezer are over 20 years old and there are better insulated quieter models available that use less than half as much electricity.
Being under the worktop without any rear ventilation uses 25-30% more electricity too because the heat has nowhere to go. The fridge also becomes a freezer in the summer because the trapped heat at the back affects the internal thermostat resulting a feedback loop until my carrots are sitting in a frozen pool of ice.
Not enough space
Before I can get a new fridge and freezer they need to fit under the worktop. There are two popular widths for these appliances (55cm and 60cm) and both of the existing ones are 55cm wide in a space designed for that size only. In order to get the models that I want to fit I need to find an extra 5cm of space because the new fridge is only available in 60cm wide.
The cabinets to either side are made of wood so I took one of them out and made it 5cm narrower:
![[Kitchen cabinet now 5cm smaller with doors that are too large]](/assets/2022/10/15/IMG_20220904_155234_2.jpg)
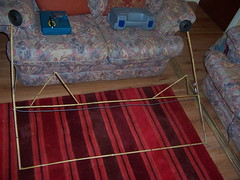
The cabinet doors are now too wide for the cabinet so one of them needs to be made smaller:
![[Cabinet door cut in half with 8mm steel rod as dowels]](/assets/2022/10/15/IMG_20220906_213430_2.jpg)
![[Kitchen cabinet with 5cm extra space to the left of it]](/assets/2022/10/15/IMG_20220907_125321_2.jpg)
There's now an extra 5cm of space so I can fit a 60cm and 55cm appliance under the worktop.
Not enough ventilation
The instructions for the new fridge and freezer come with warnings of damaging the compressor if there's no ventilation at the back. Some of the heat can escape over the top (to the front of the worktop) but not enough to stop an excessive build-up of heat in the summer.
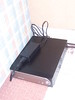
I cut a long narrow ventilation hole in the back of the worktop and laser cut a cover for it out of plastic:
![[Kitchen worktop leading into the dining room with a 6cm wide vent at the back of it]](/assets/2022/10/15/205_7696_2.jpg)
![[Kitchen worktop from above with a 6cm wide vent at the back of it]](/assets/2022/10/15/205_7707_2.jpg)
There's now enough ventilation for the heat to escape at the back. Be careful doing this with old appliances because my freezer immediately developed a condensation problem now that the excess heat was no longer warming the outer surfaces.
New fridge and freezer
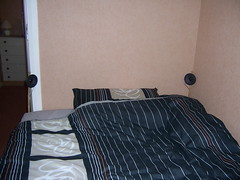
With all the worktop and cabinet alterations complete, I can now install the new fridge and freezer:
![[Under-counter fridge and freezer below the kitchen worktop with a 6cm vent at the back aligned to the space between the cabinets and combined width of the two appliances]](/assets/2022/10/15/205_7745_2.jpg)

![[Boiler with hot water pipes cut off]](/assets/2019/02/16/boiler_before.jpg)
![[Water pipe in 22mm branching off to 15mm]](/assets/2019/02/16/downstairs_before.jpg)
![[Water pipe in 15mm branching off to 15mm]](/assets/2019/02/16/downstairs_after.jpg)
![[Pipe behind shower room sink in 22mm]](/assets/2019/02/16/shower_room_sink_before.jpg)
![[Pipe behind shower room sink in 15mm]](/assets/2019/02/16/shower_room_sink_after.jpg)
![[Boiler reconnected with 15mm hot water pipe]](/assets/2019/02/16/boiler_after.jpg)
![[White 2 gang light switch with a shower symbol engraved above the left switch and a light bulb engraved above the right switch]](https://c1.staticflickr.com/5/4701/39223123895_85ed7d5e3d.jpg "Engraved Light Switch")
![[Bench before starting work]](/assets/2017/09/17/20170810_204110.jpg)
![[Bottom side of the bench after partial painting]](/assets/2017/09/17/20170819_113053.jpg)
![[Seat bars after painting]](/assets/2017/09/17/20170819_113114.jpg)
![[Top side of the bench after partial painting]](/assets/2017/09/17/20170820_102454.jpg)
![[Bench outside on slabs next to the greenhouse]](/assets/2017/09/17/20171028_113100.jpg)
![[Bench leg with rubber door stop on the bottom]](/assets/2017/08/10/20170810_203003.jpg)
![[Bench outside on slabs next to the fence]](/assets/2017/08/10/20170810_203616.jpg)
![[Closed metal enclosure with electricity supply input/output cables and RS485 cable]](https://c1.staticflickr.com/3/2938/34070181472_ee98e34c1d_n.jpg)
![[Metal enclosure with lid open showing 80A and 6A circuit breakers and the Power Meter]](https://c1.staticflickr.com/3/2944/33385507294_f393083a26_n.jpg)
![[Metal enclosure with the cover off showing the circuit breakers and Power Meter]](https://c1.staticflickr.com/3/2822/33385508094_8b22c97615_n.jpg)
![[Electricity distribution board with the live supply out of the 100A isolator going via the Power Meter]](https://c1.staticflickr.com/3/2911/34227274435_b7baa8c381_n.jpg)
![[Bottom side of the bench after sanding]](/assets/2016/08/31/20160702_203247.jpg)
![[Seat bars before sanding]](/assets/2016/08/31/20160702_203317.jpg)
![[Top side of the bench after sanding]](/assets/2016/08/31/20160821_143037.jpg)
![[Bottom side of the bench after partial painting]](/assets/2016/08/31/20160825_190124.jpg)
![[Top side of the bench after completion of painting]](/assets/2016/08/31/20160831_200717.jpg)
![[Armoured cable with outer layer partially stripped]](https://farm8.staticflickr.com/7373/16333566798_a26c051ef4_m.jpg)
![[Armoured cable with armour layer cut]](https://farm8.staticflickr.com/7325/16519568121_312229b2b5_m.jpg)
![[Armoured cable fitted to gland with inner layer stripped]](https://farm9.staticflickr.com/8679/15901096003_9dd67fda25_m.jpg)
![[Garage consumer unit with supply armoured cable fitted]](https://farm8.staticflickr.com/7441/16334992469_714c9d4a3e_m.jpg)
![[Powered garage consumer unit]](https://farm8.staticflickr.com/7337/16335349757_e7def893f4_m.jpg)
![[Electricity meter board with garage supply switch]](https://farm9.staticflickr.com/8624/16495317376_a175752f17_m.jpg)