I've previously modified a radio clock that can't get a reliable time signal to use NTP via an ESP32-S3 but have recently improved it so that it waits for the time to be known before powering on the radio clock, which avoids the radio clock deciding that there's no time signal and reverting to manual mode. It now also automatically presses buttons to configure the radio clock to display 24 hour time.
Recently in Electronics Category
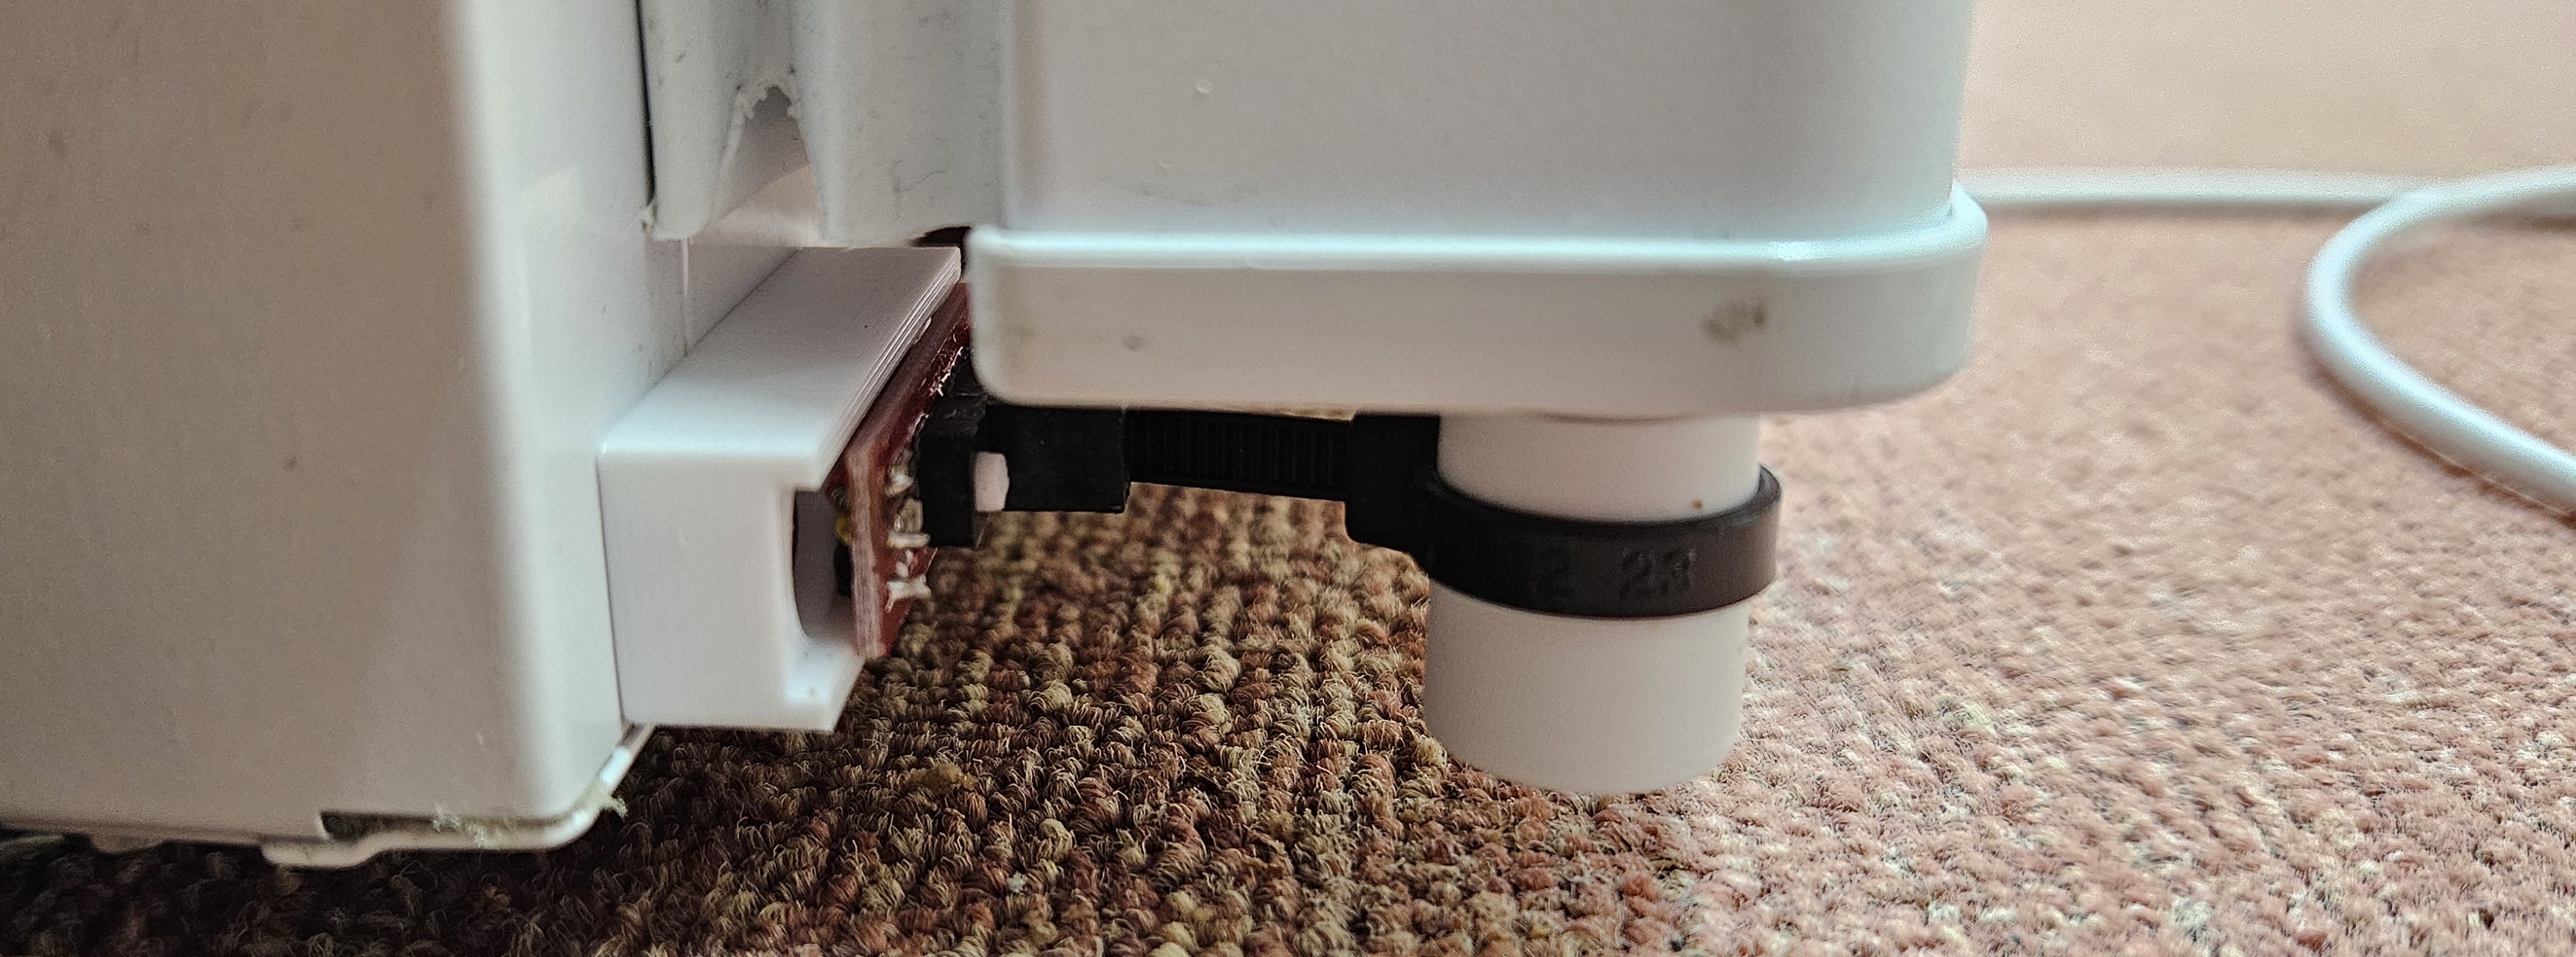
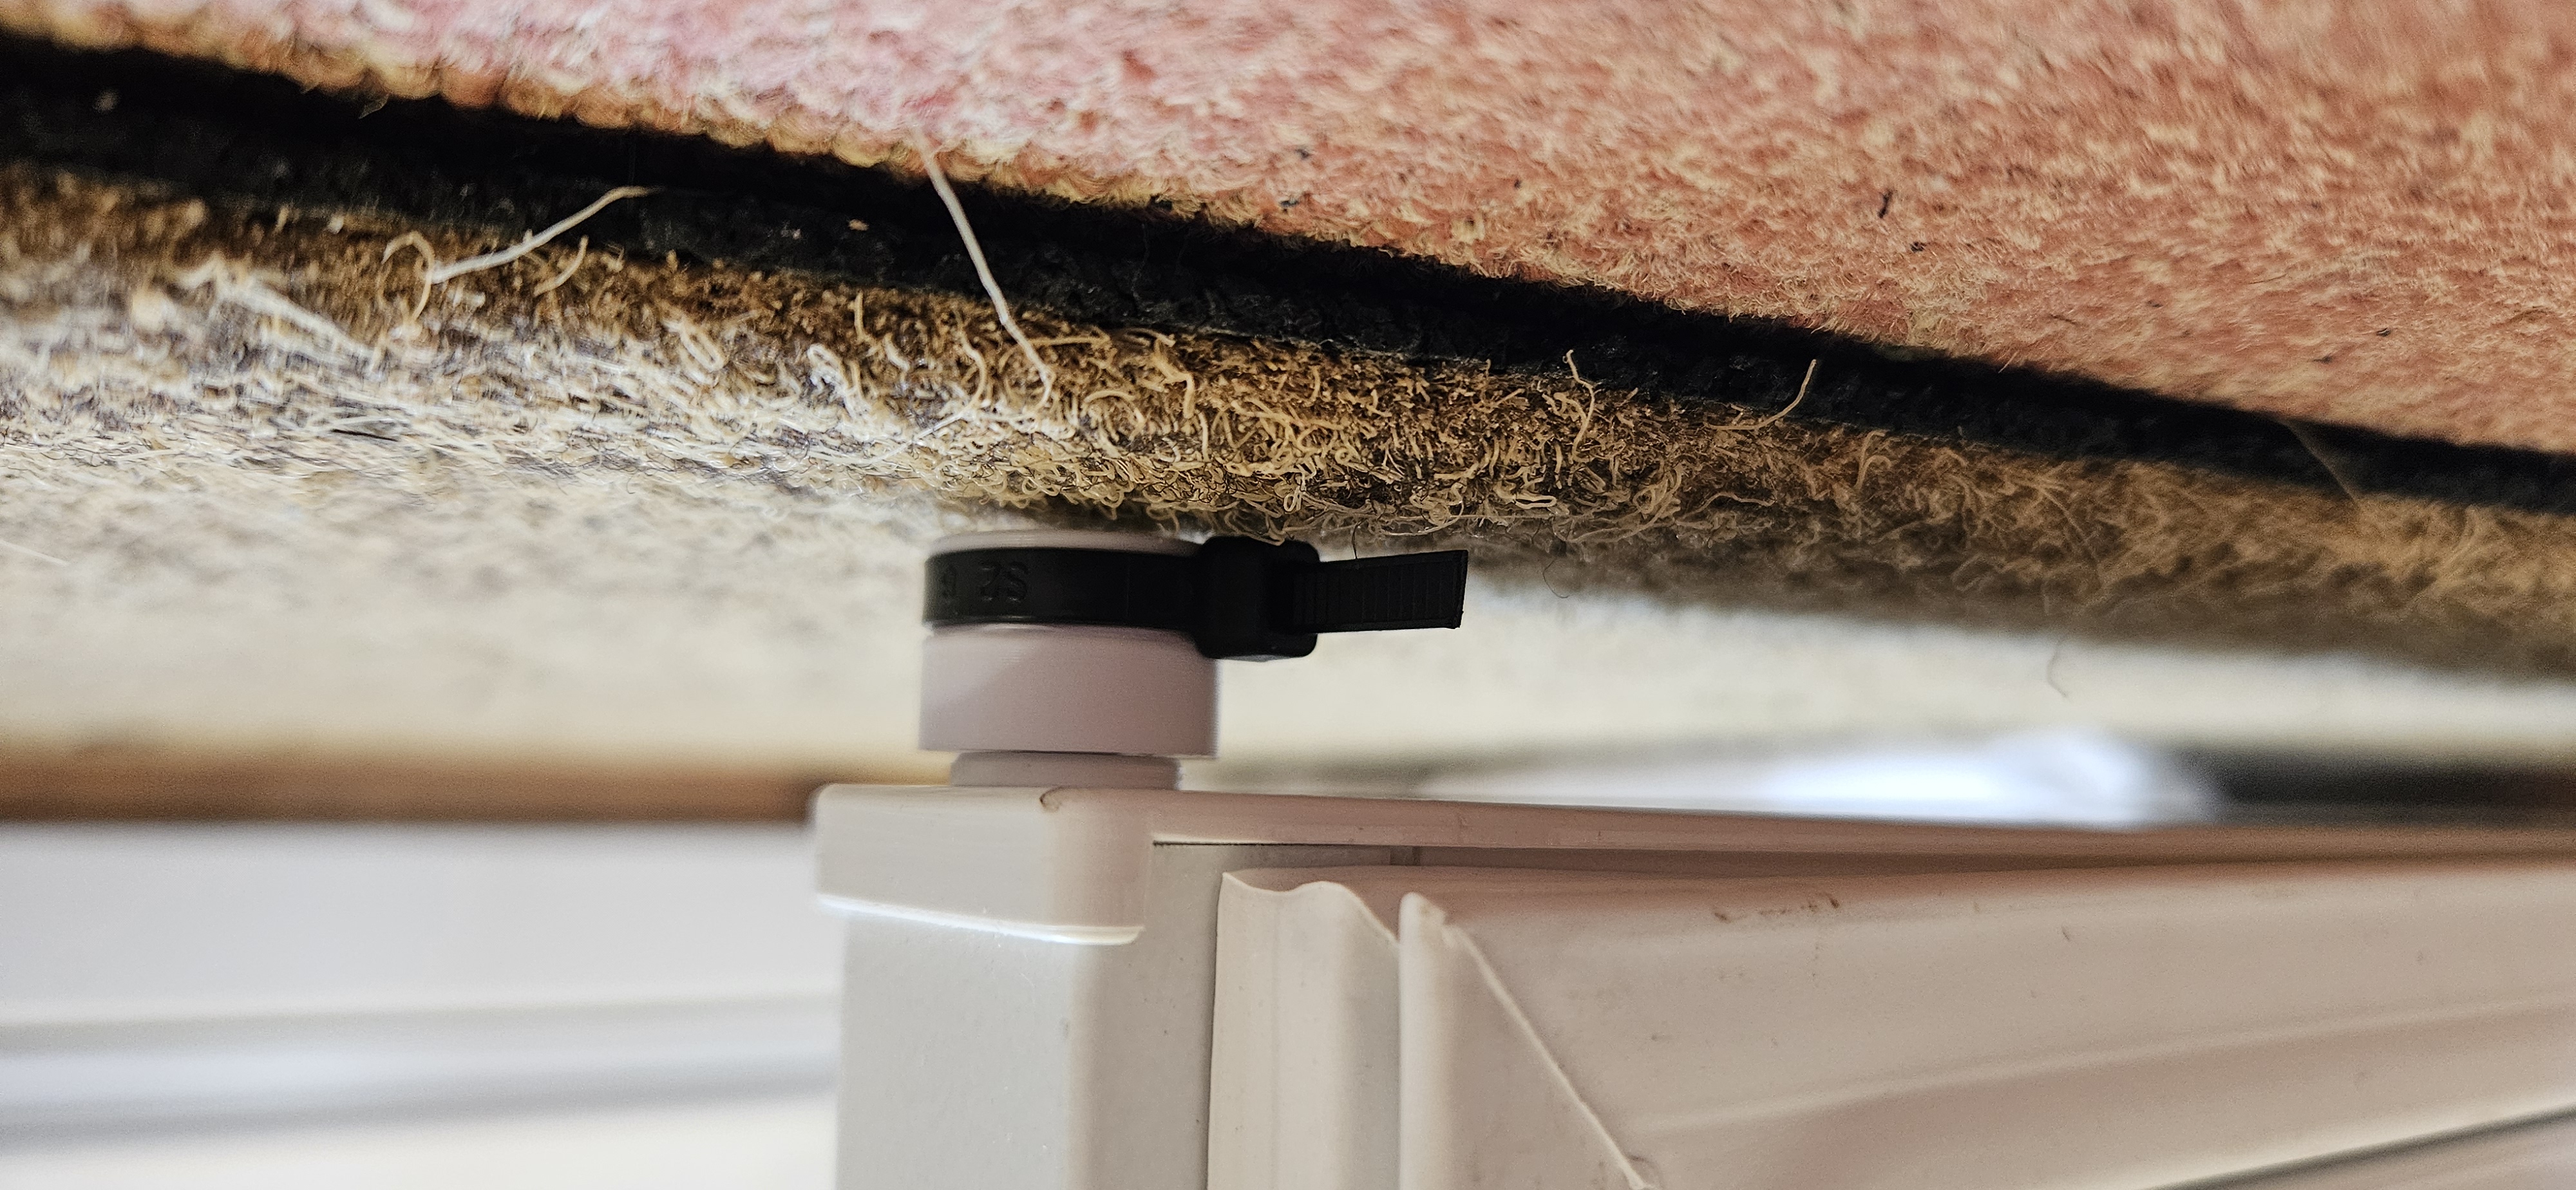
After leaving the freezer door open all evening twice in hot weather in previous years I started working on a fridge/freezer door alarm to warn me if this happens again. My model of fridge/freezer happens to have convenient anchor points for this:
Using an ESP32-C6 I've made the "Eightfold Seal" device that supports two doors and a buzzer alarm with increasing frequency when the door is left open. It communicates using Zigbee allowing remote configuration and status information, as well as the possibility to cancel the current alarm if the door is intentionally left open.
![[Home Assistant list of controls for the Eightfold Seal device: cancel/enable switches for the alarm and configuration of timing for the two alarm stages]](/assets/2025/05/11/hass_eightfold_seal_controls.png)
![[Home Assistant list of sensors for the Eightfold Seal device: current alarm and door open/closed state as well as uptime and Zigbee uplink information]](/assets/2025/05/11/hass_eightfold_seal_sensors.png)
When either door is open even slightly, this is detected and the buzzer will sound after a delay. Here are some videos with the buzzer configured for no delay to demonstrate the sensitivity:
I had to print a custom lower profile insert for the freezer door because there's a mat nearby and very little clearance below the door because of that:
With the Zigbee remote-controlled lights and sockets I now needed a way to switch them that's more convenient than a mobile phone. There are various solutions available for this but the best looking one I could find is the IKEA TRÅDFRI Shortcut Button that can be used with any Zigbee coordinator. I can use these to switch lights on and off, play/pause music and turn speakers on/off.

They work well but the battery management in the first version of the firmware isn't great and they regularly lose network pairing information for me when the battery runs out so I upgraded to the latest firmware (which is documented as fixing this issue).
One of the often requested features on these buttons has been the ability to set an action on a double press (as well as the original single press and long press gestures). The later firmware versions have added this feature.
Unfortunately to implement a double press requires delaying the reaction to a single press. Lights that would previously change instantly now take about half a second to do so which is visibly slow and irritating when you know that it used to be faster and doesn't have to be this way.
Trying to get IKEA to fix this is likely to be impossible and they don't provide any kind of email-based support that would allow complex technical issues to be communicated. Even if they could be persuaded that there was a need to make a change it could take months or years before they implemented it.
I don't want to wait that long before I can upgrade all of my push buttons to get better battery management, so I've decompiled the latest firmware and determined what to change to be able to disable the double press feature and remove the 400ms delay on single presses:
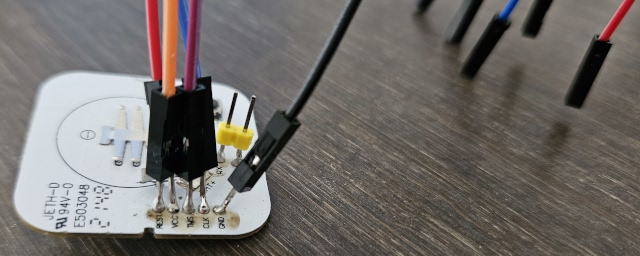
Full details on the firmware modifications and accessing the flash.
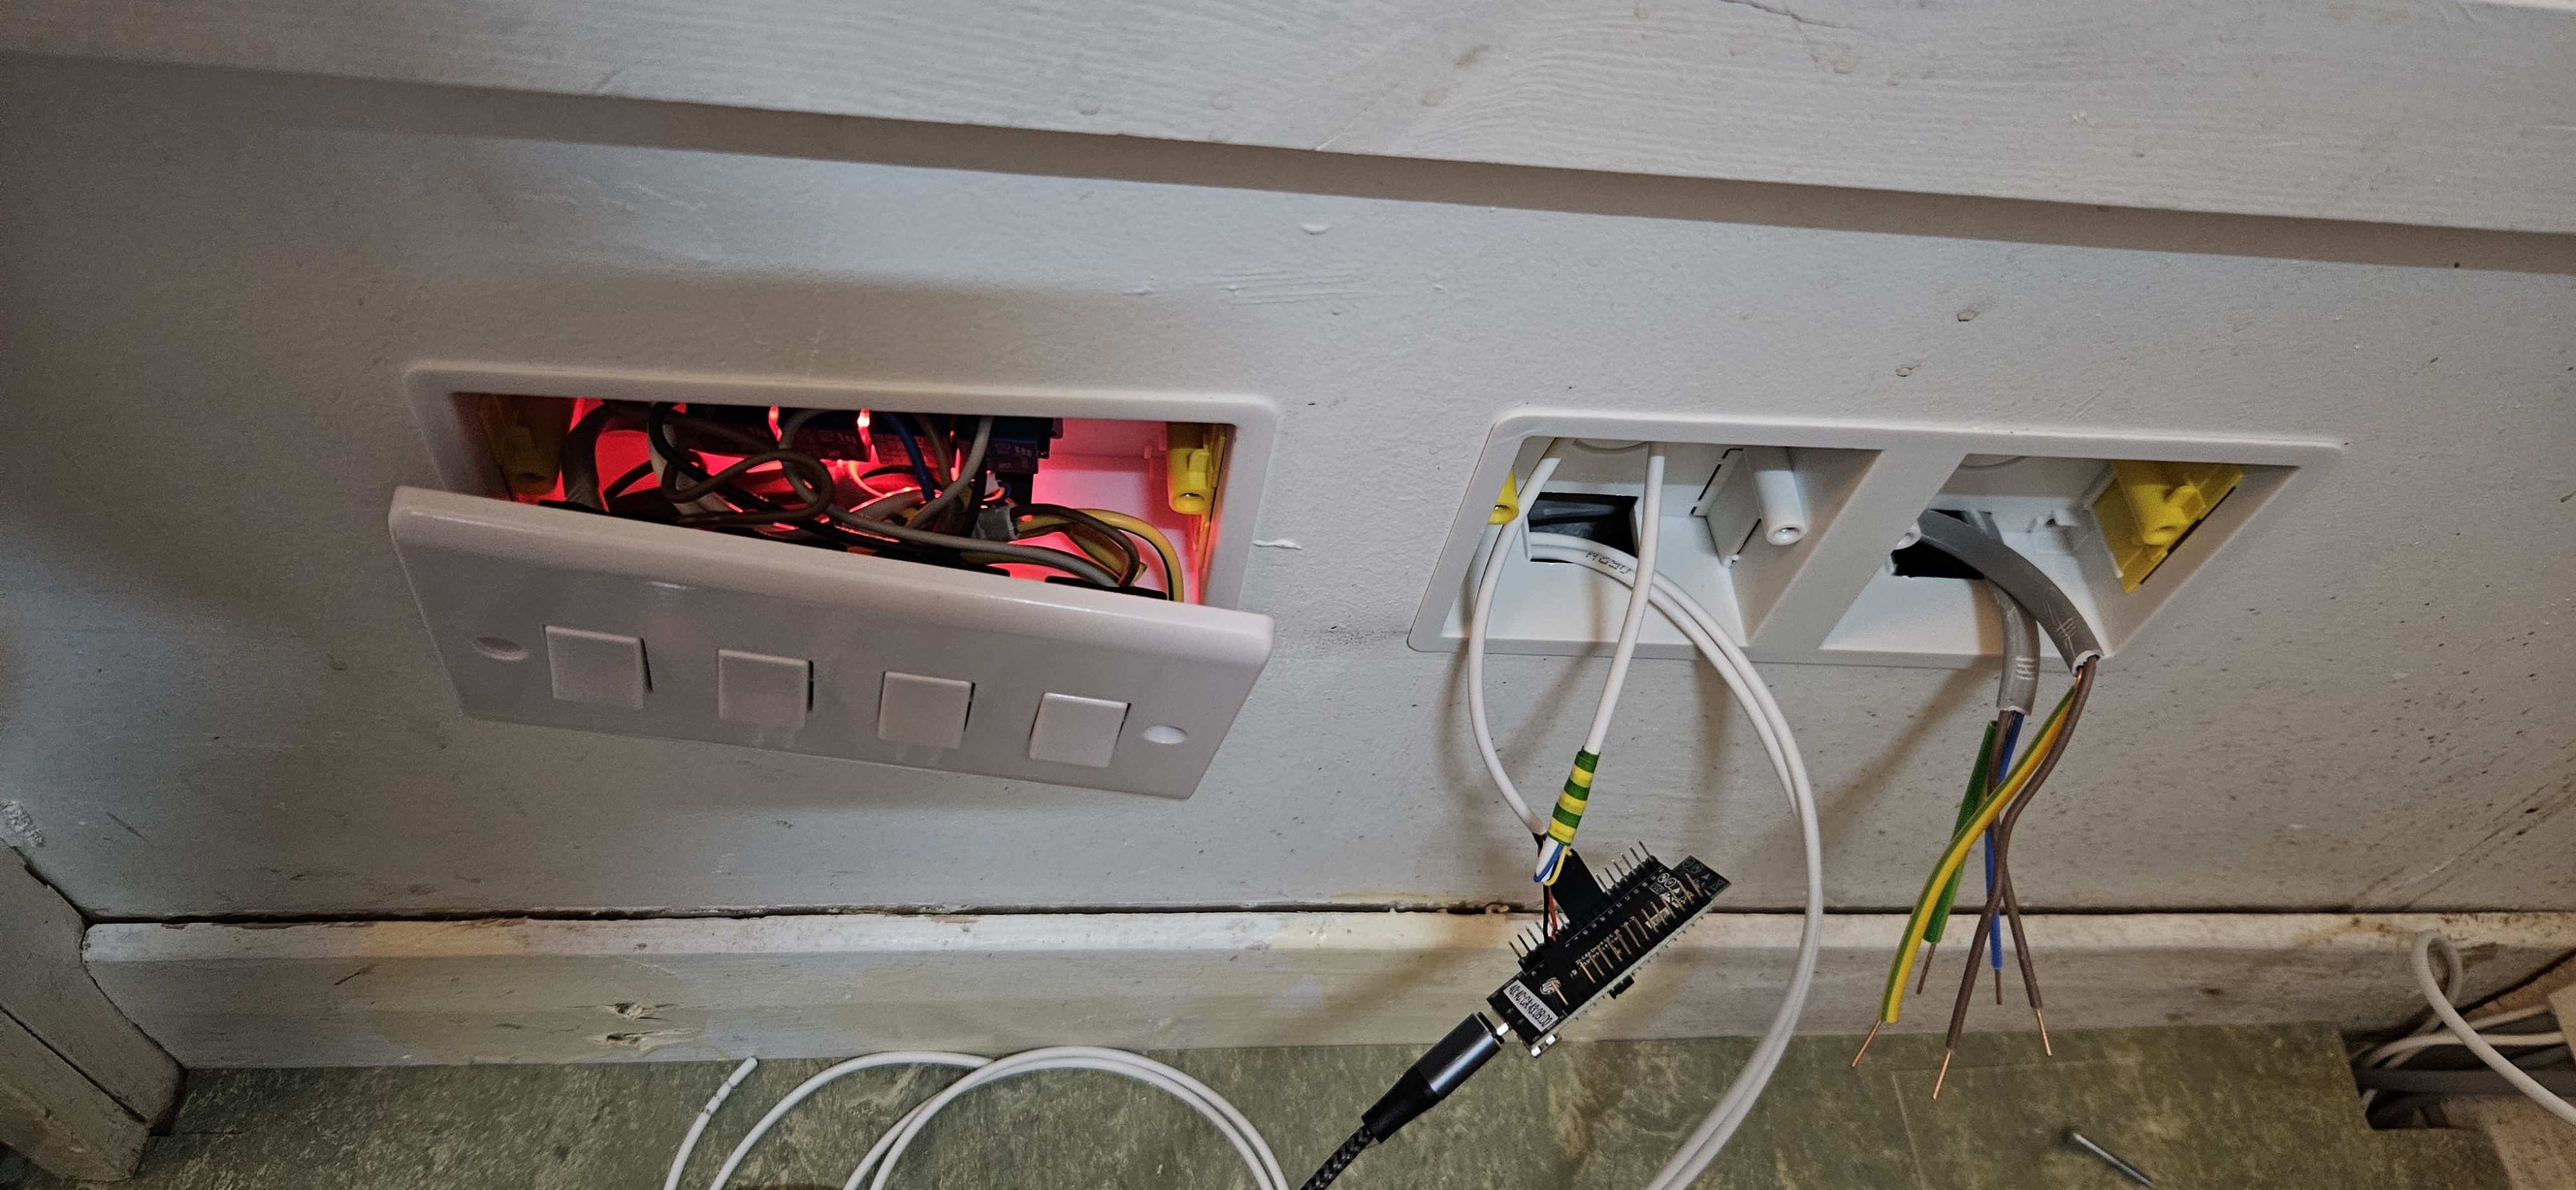
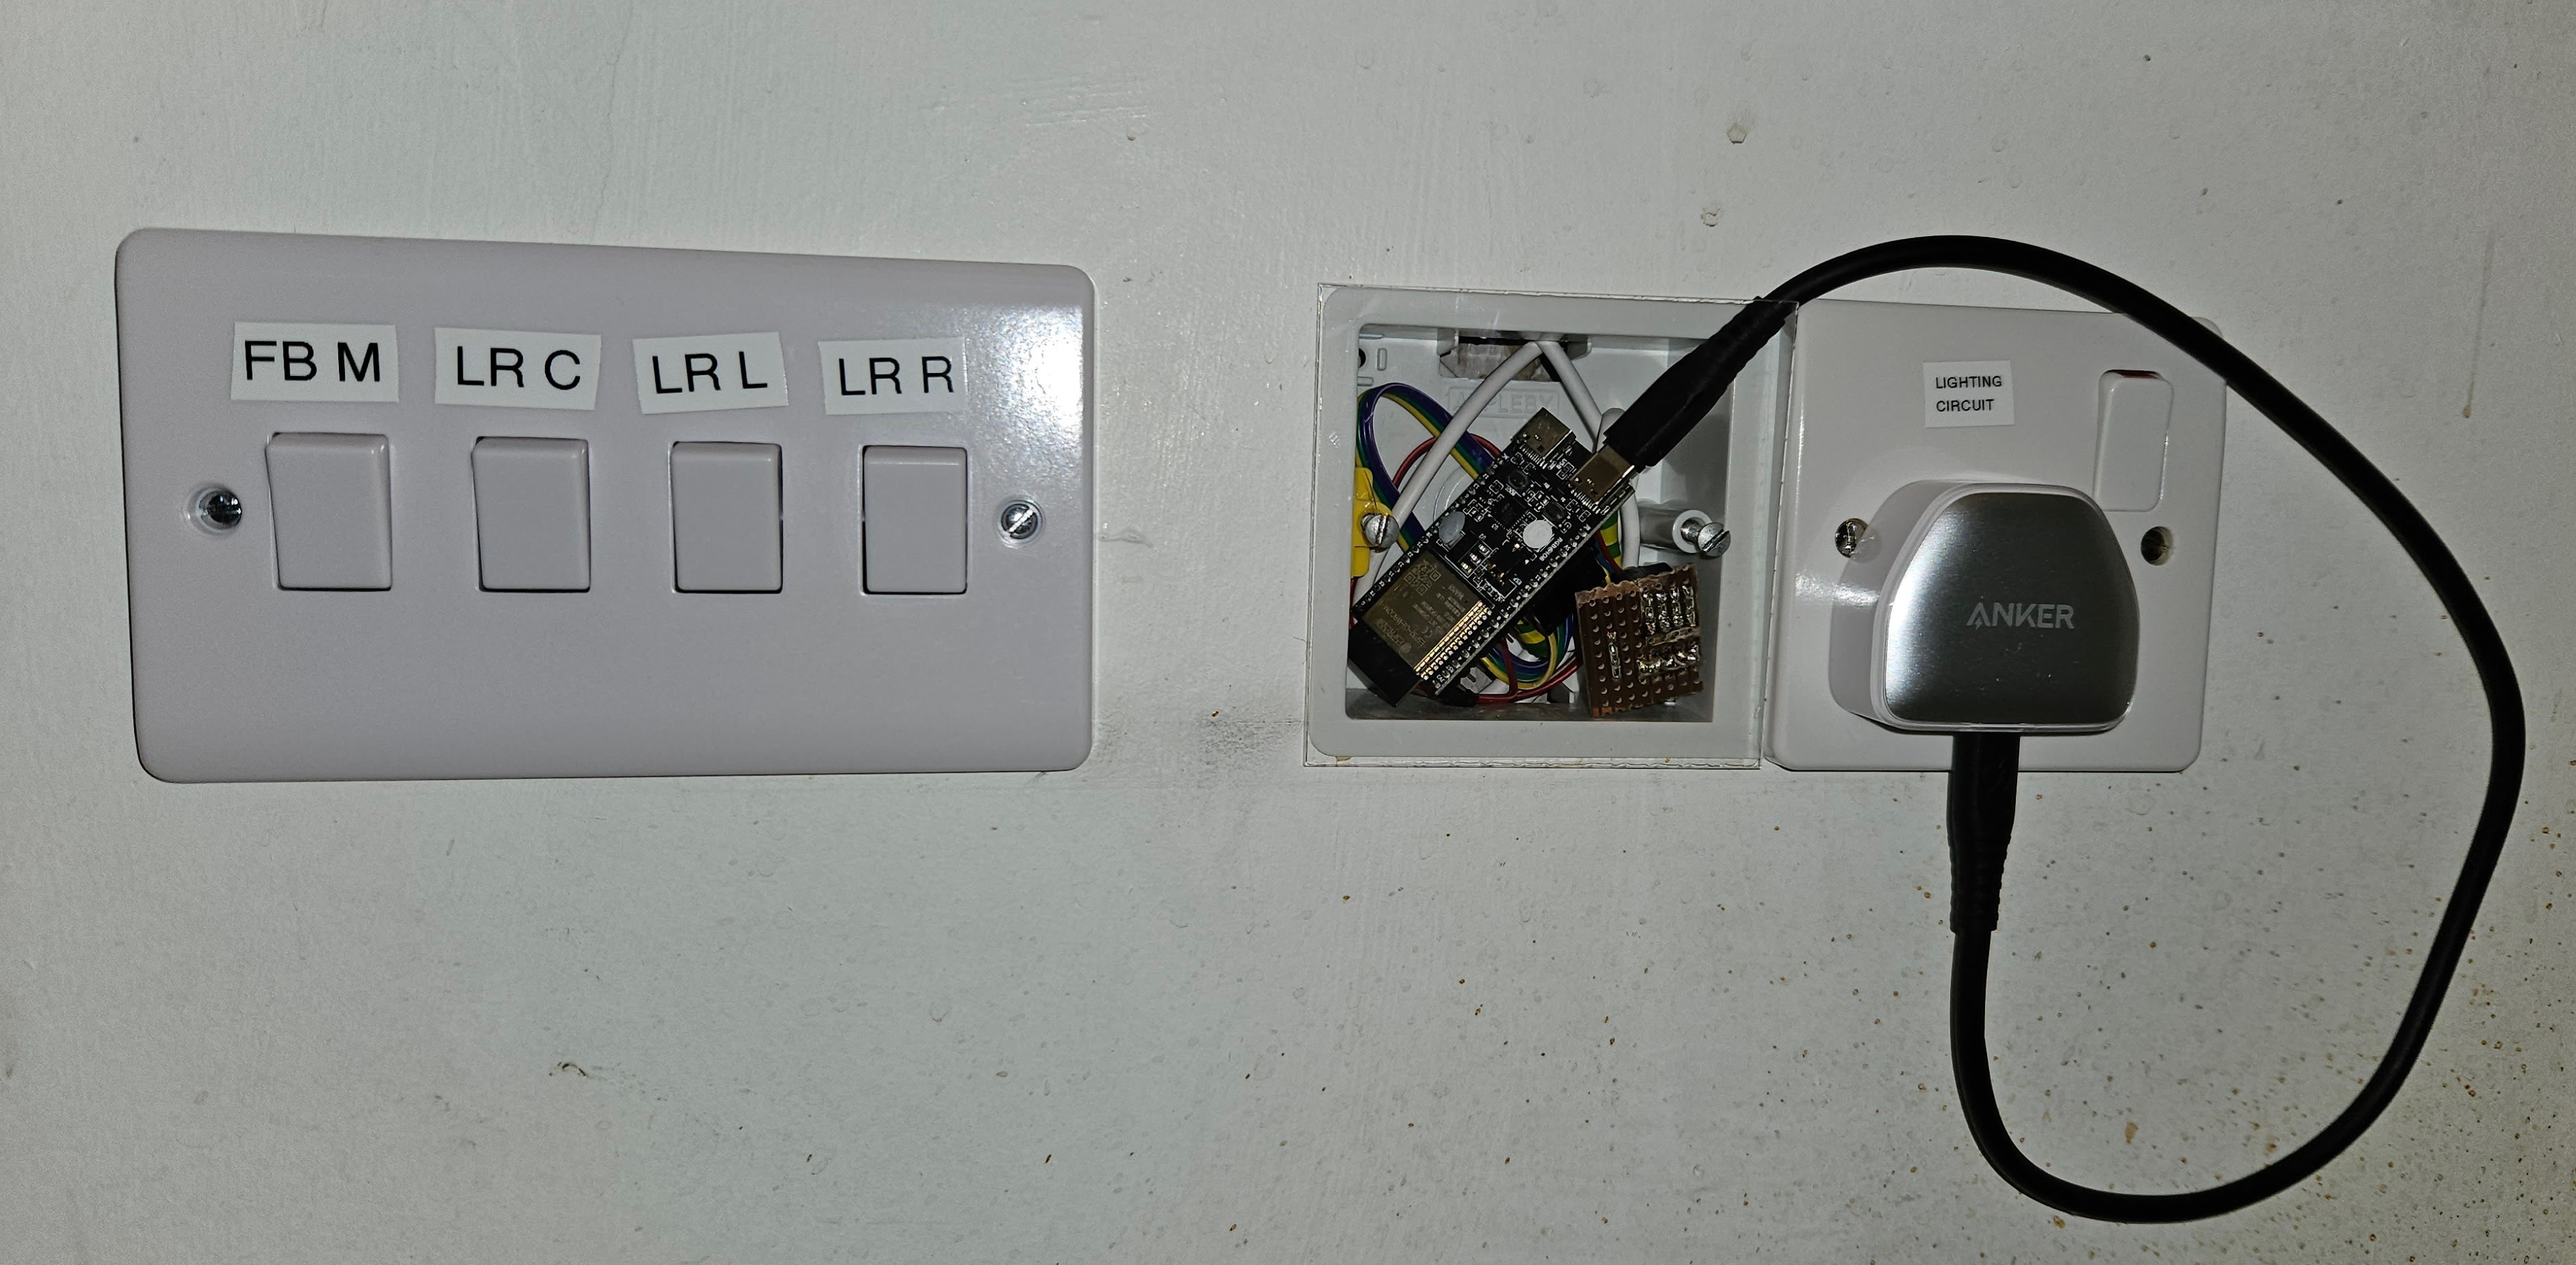
With a recent oven purchase I only had one device left that required the clock to be manually synchronised - a timer that I use to turn a light on in the morning. Having had to replace some remote controlled sockets with Zigbee variants I decided to do the same with the light timer so that it can be controlled by a computer that always has the correct time.
That worked ok but I wanted more integration with the light switch and since my living room lights could already be remotely switched by a different system I have consolidated both of them into a single light controller. There aren't any existing solutions for this that can handle multiple lights and multiple switches (you can have one relay/switch, or multiple relays plus multiple switches but Zigbee doesn't guarantee good integration in that scenario).
Using an ESP32-C6 I've made my own solution, the "Candle Dribbler" that satisfies my obscure requirements for how remotely controllable light switches should behave:
I've changed keyboard to one without a number pad so I've made my own numeric keypad using a YMDK kit and countersunk some black hex screws to make it look nice:

There's an extra row on the top for additional keys and the LEDs on the bottom of the keypad light up to indicate the number lock state.

I bought these speakers before purchasing a standing desk because my existing speakers were attached by a fixed length cable. The cable had to be a certain length because the volume controls used capacitive touch all the way back to the amplifier/subwoofer.
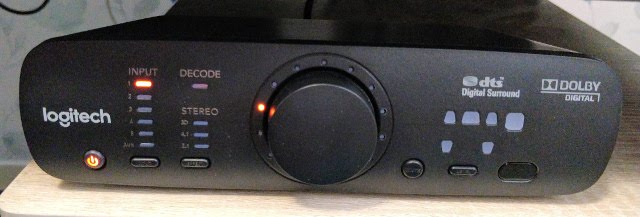
These speakers have a separate controller console attached using a cable with a DE-15 connector so it can be extended with any VGA extension cable.
I turn the power on/off remotely with a keyboard shortcut but the speakers always turn on in standby mode. Having reverse engineered the protocol between the console and amplifier I could bypass this but the console itself would still not turn on. If it's not turned on then the volume control knob won't do anything.
By decompiling the firmware on the microcontroller inside the console I was able to find and modify a parameter that would make it turn on automatically when powered on. I also found a hidden feature to disable the automatic standby that happens after 2 hours and the procedure for enabling this (hold the "level" button for 5 seconds until the level change light goes out).
Full details on the interface, protocol and firmware access.
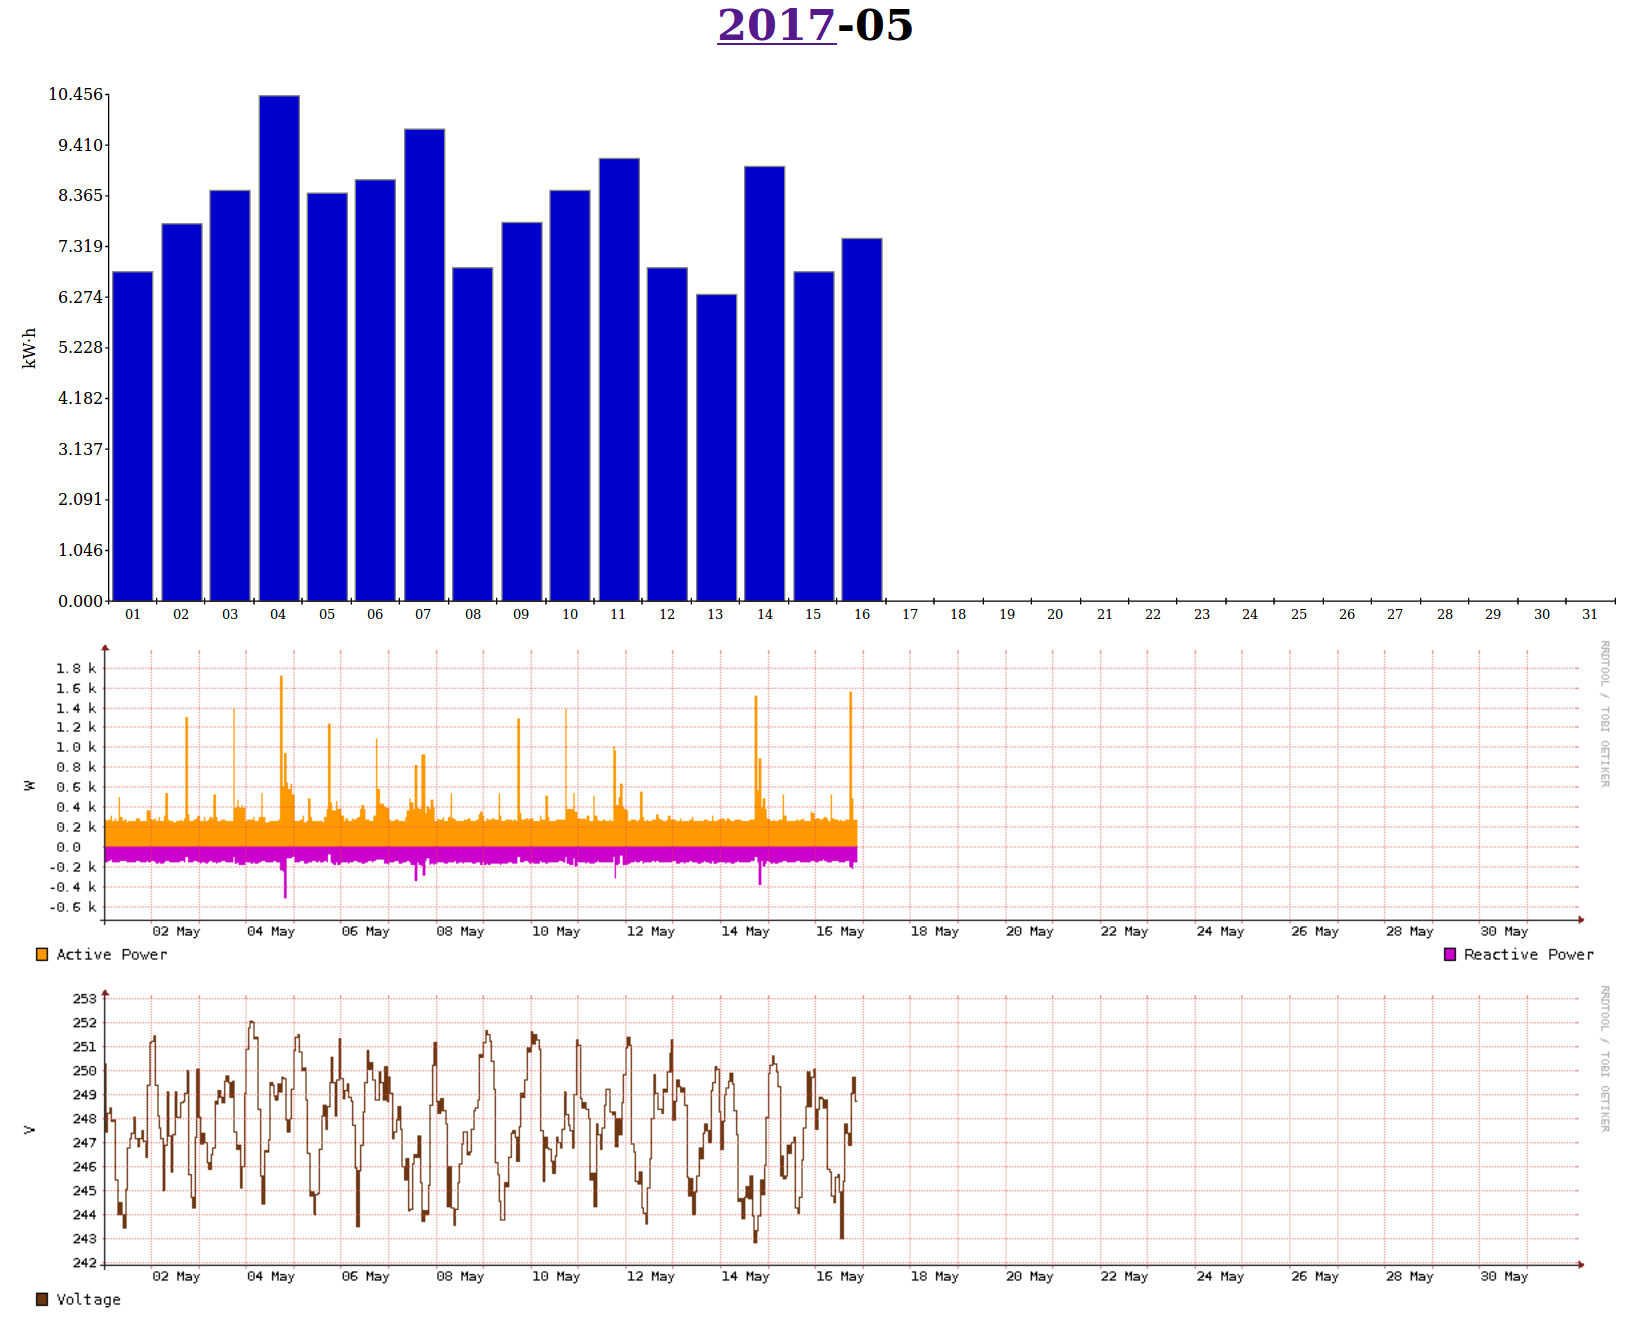
I've recently installed an 80A Power Meter on the electricity supply to my house. It measures the current active, reactive and apparent power as well as providing a count of the total active and reactive energy. These reading are updated every second.
After installing a 100A isolator and pulling through extra cables, the installation of the power meter was relatively straight forward. It's in an enclosure with an 80A circuit breaker, located inside to avoid inconvenience if it ever trips and because the distribution board doesn't have enough space for it.
![[Closed metal enclosure with electricity supply input/output cables and RS485 cable]](https://c1.staticflickr.com/3/2938/34070181472_ee98e34c1d_n.jpg)
![[Metal enclosure with lid open showing 80A and 6A circuit breakers and the Power Meter]](https://c1.staticflickr.com/3/2944/33385507294_f393083a26_n.jpg)
![[Metal enclosure with the cover off showing the circuit breakers and Power Meter]](https://c1.staticflickr.com/3/2822/33385508094_8b22c97615_n.jpg)
![[Electricity distribution board with the live supply out of the 100A isolator going via the Power Meter]](https://c1.staticflickr.com/3/2911/34227274435_b7baa8c381_n.jpg)
I intend to write an Android app for a real-time view but for now I'm just collecting historical data:
")
I bought one of Adafruit's Proto Cape Kit for my Beagle Bone Black so that I could put 3 relay circuits and pin headers on it. The double-sized PCB is supplied with separate pin headers that you have to solder on yourself.
It provides access to all of the pins but only SYS_5V is provided as a set of power lines and not VDD_5V, so limited current is available. However, this doesn't matter too much given that there is very little space for components.
I had to really squash everything in and use a lot of wires because there was no chance of creating an optimal layout:
")
")
My freezer compartment doors now open and close instead of lifting out thanks to Adrian's 3D printer:

I've had to glue all but one of them in place as some of the plastic to hold them in has actually broken off the door itself, but they work quite well:
I've had to glue all but one of them in place as some of the plastic to hold them in has actually broken off the door itself, but they work quite well:
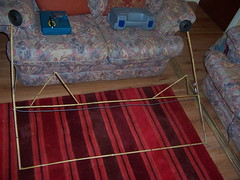
I had an unused Mini-ITX computer which I can make silent (by removing the fan) as long as it isn't doing anything too intensive, and some spare speakers from a broken CD player... so I put together some remote speakers to play music on.
With some cheap bamboo cane and tie wraps I've mounted them at the head of my bed. The server boots over the HomePlug network allowing MPD to connect to it. I'll add a wireless remote control soon.